Sunday, February 24, 2013

Goat Cheese and Greens' Stuffed Chicken

I'm a huge fan of stuffed chickens breasts! Between Chicken Kiev, Chicken Cordon Bleu, Broccoli and Cheddar Chicken, and any possible combination that includes cheese, I love them. Now that I'm cutting back on gluten, the only problem is the crust - finding that perfect substitute that satisfies an alternate to breadcrumbs. The solution? Cornflakes. My grandmother used to bread her country-style drumsticks with cornflakes, and I grew up thinking that it was the norm. In addition, another alternative to breadcrumbs is potato flakes (i.e., instant mashed potatoes). I prefer cornflakes (the organic ones) because they're lower in sodium and processed junk, and have a much more satisfying crunch. Enjoy!

Ingredients:

4 chicken breasts, boneless and skinless
1 cup goat cheese, softened
1 cup spinach, whole leaves
1/2 cup basil, whole leaves
1 egg, beaten
2 cups cornflakes, ground (I've used a plastic bag and a hammer many times)
1 tbsp basil, dried
1 tbsp garlic powder
1 tbsp black pepper, cracked
Several toothpicks

Method:

1) Preheat oven to 350F. Prepare chicken breasts by gently beating them with a mallet to approximately 1/4'' thick.
2) Put 1/4 of spinach leaves and 1/4 of basil leaves on the surface of each chicken breast, and place 1/4 of goat cheese on top of the greens.
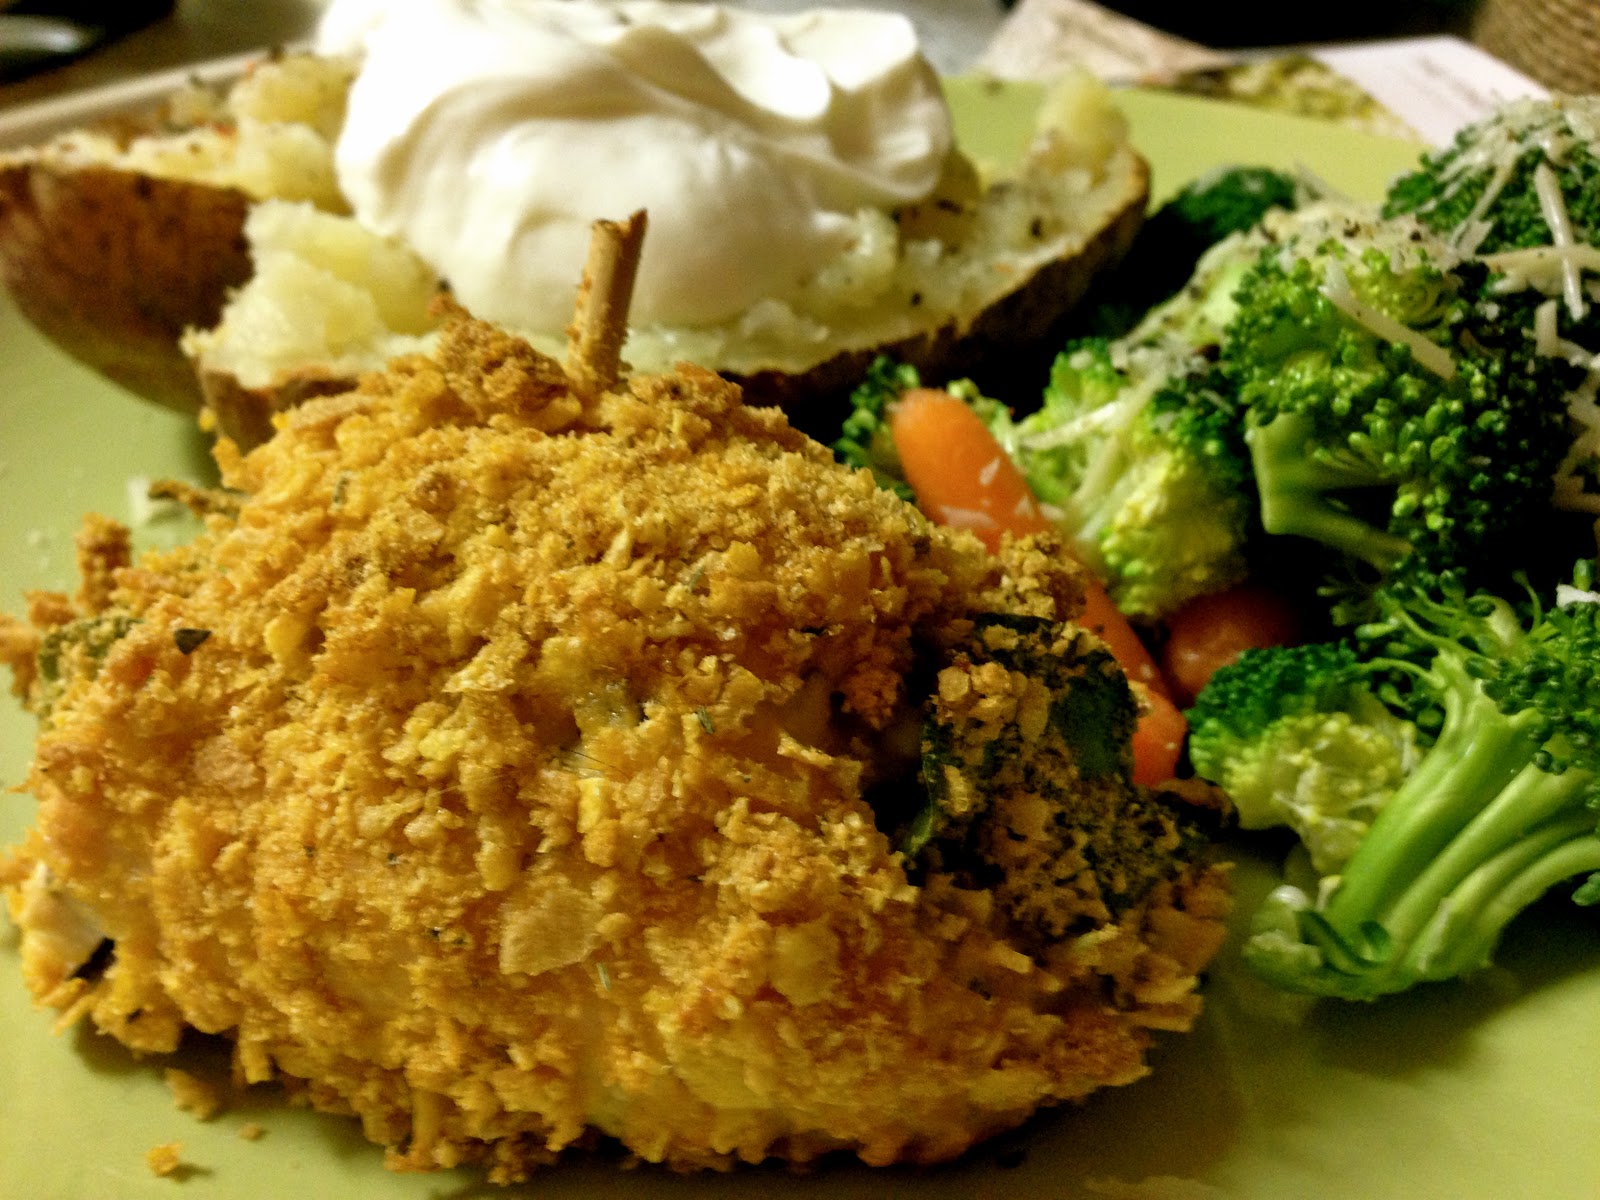
3) Gently begin to roll the chicken, folding in the edges, and securing all creases with toothpicks.
4) Once each breast is secured, transfer to bowl with beaten egg, coating thoroughly. Transfer egged chicken breasts to bowl with ground cornflakes and generously coat with crumbs.
5) Transfer chicken breasts to baking dish, and top with freshly cracked pepper, basil, and garlic powder.
6) Bake chicken breasts until juices run clear (approximately 20-30 minutes).
7) Remove chicken from oven, and let stand for 10 minutes. Remove toothpicks gently and serve!

Bleu Cheese Crusted Filet Mignon

Adapted from one of my favorite Canadian restaurants, this is in my top three favorite meals of all-time. It. is. AMAZING. I don't eat a lot of red meat in my every day diet, but when I do, it comes in the form of plump filet mignon steaks wrapped in hickory-smoked bacon. There is something about pairing Bleu cheese with beef that is simply delectable. I also included a recipe for a nice red wine au jus that takes this recipe over the edge. Beware: having this recipe is slightly dangerous! I recommend serving with grilled asparagus, garlic mashed potatoes, and a very generous glass of a full-bodied spicy red wine.


Red Wine Au Jus 

Ingredients:
1 tbsp butter
1/2 cup white onion, minced
3 cloves garlic, minced
1 tsp fresh thyme, finely chopped
3/4 cup low-sodium beef broth
1/2 cup port wine

Method:
1) Melt butter in a skillet over medium heat. Add onion, minced garlic and thyme. Cook, stirring frequently until onion is tender.
2) Stir in beef broth and port wine. Bring to a boil, and cook until mixture has reduced to approximately 1/2 cup. Set aside.

Filet Mignon

Ingredients: 

4 8-oz filet mignon steaks
4 pieces hickory smoked bacon (optional)
1 cup Bleu cheese, crumbled
1/4 cup bread crumbs (crushed cornflakes work too!) 
1 head garlic, roasted
1 tbsp olive oil

Method:

1) Preheat oven to 350F. Chop top of garlic head off (leaving peal on), drizzle with olive oil, sprinkle with salt and pepper, wrap in tinfoil, and bake for 30 minutes.
2) Wrap steaks with one strip of bacon, using a toothpick to secure. Heat oil in a cast-iron skillet over high heat, and sear steaks quickly until brown, then transfer entire pan to the oven.
3) Roast steaks in the oven for about 15 minutes for medium rare (internal temperature of 145F). Remove from oven and place on baking sheet.
4) In a small bowl, combine bread crumbs and Bleu cheese, top each steak with a thick layer of this mixture.
5) Preheat the oven's broiler, and broil steaks until cheese topping is browned and bubbling (approximately 3-4 minutes). Remove from oven, and let stand for 15 minutes.
6) Remove roasted garlic from oven, and gently fork out the cloves from the skin. 
7) Top steaks with 4-5 cloves of roasted garlic and serve with warm red wine au jus.

Chicken Tikka Masala

I'm stealing this recipe from my husband, because it needs to be shared! Tikka Masala is hands-down my favorite component to any Indian meal (well, throw in some vegetarian samosas too). We both love our food extra spicy, so feel free to tone down the use of jalapenos and cayenne pepper if you can't tolerate the heat. This meal is a little time consuming, but well worth the effort. The creamy, cinnamony, spicy goodness pairs perfectly with chicken, but could be done with anything - eggplant, tofu, beef, lamb, paneer-style cheese etc. Serve with brown Basmati rice to soak up the extra sauce, and throw in some veggies (of course!).

Ingredients:

1 cup yogurt, nonfat (Greek is perfect!)
2 tsp cumin, ground
1 tsp cinnamon, ground
4 tsp cayenne pepper, ground
2 tsp fresh black pepper, cracked
2 tsp paprika
1 tbsp fresh ginger, minced
2-4 tsp salt (preference)
2 cloves garlic, minced
2 jalapeno peppers, finely chopped
 3 chicken breasts, boneless and skinless, cut into bite-sized pieces
1 tbsp butter
1 8-oz can tomato sauce
1 cup heavy cream
1/4 cup fresh cilantro, chopped
4 long skewers

Method:

1) In a large bowl, combine yogurt, lemon juice, 2 tsp cumin (save 2 tsp for later), cayenne pepper, black pepper, and salt.
2) Stir in chicken, cover, and refrigerate for at least 1 hour (the longer you let it marinade the better - overnight is ideal).
3) Once chicken has marinated, preheat a grill or broiler to high heat. Lightly oil the grill grate, and thread chicken onto skewers, discarding of remaining marinade.
4) Grill until juices run clear, about 5 minutes on each side.
5) In a large skillet on medium heat, melt butter, add garlic and jalapenos and saute for 1 minute. 
6) Season with remaining cumin and paprika, and gently stir in tomato sauce and cream. Reduce heat to low, and simmer until sauce thickens (approximately 20 minutes).
7) Add grilled chicken and simmer for additional 10 minutes. Transfer to a serving platter, and garnish with fresh cilantro.

Vegetarian Fettucine Alfredo

Okay, I know what you're thinking - there is NOTHING healthy about Fettucini Alfredo. You're right. But, when you add vegetables, use brown-rice noodles, and make the sauce gluten-free from scratch you can feel slightly better about this indulgent comfort food. My philosophy: I don't think anyone should restrict themselves from any food - be it fattening, full of carbohydrates, all sugar, or a stick of butter. With that being said, I do think that the foods we put into our bodies should be whole, not processed, and homemade. Everything in moderation, including moderation. Throw in some cardio too. Bon appetit!

Ingredients:

2 tbsp unsalted butter
1 cup heavy whipping cream
1 cup half and half cream
4 cloves garlic, minced
2 tbsp black pepper, cracked
2 tbsp salt, cracked
1 cup Parmesan cheese, grated
1 pound fettucini-stlye brown rice pasta (or regular fettucini)
3 carrots, chopped into rounds
2 cups green beans, chopped into thirds
2 cups spinach, finely chopped
1 cup fresh peas, raw

Method:

1) In a sauce pan on medium heat, melt butter and add salt, pepper and minced garlic. Saute for approximately 5 minutes, until garlic begins to brown.
2) Add heavy cream and half and half, stirring gently. Reduce heat to low, add Parmesan cheese, and let simmer for 10 minutes, stirring every few minutes. Add finely chopped spinach to sauce.
3) Steam carrots, green beans, and peas in a covered pan with 2'' water until desired texture. Strain off excess water.
4) Cook pasta according to package directions. Strain, place back in original pot, and drizzle with 1 tsp olive oil to prevent sticking.
5) Serve pasta with generous serving of steamed vegetables, pouring Alfredo sauce over top, and adding additional cheese. Always add additional cheese. Always!

Thai Green Curry

There is something about the combination of coconut milk and lemon grass that is just ridiculous. A long-time lover of Thai food, I was tempted to experiment with a curry dish, having only made noodle-based dishes in the past. In this recipe, I use low-fat coconut milk - the consistency for this dish is meant to be on the runny side, but if you prefer it to be thicker, I recommend using coconut cream. Also, I tend to over do things with vegetables (why not add more vegetables to any dish?!), so feel free to modify which vegetables you use.

Green Paste 

Ingredients:

4 tbsp lemongrass, chopped
4-5 cloves garlic
1-3 green chilies (jalapeno or serrano) 
1 shallot, chopped
1 tsp ginger, grated
1/2 cup fresh coriander (cilantro) leaves & stems, coarsely chopped
1/2 cup fresh basil
1/2 tsp coriander, ground
1/2 tsp cumin, ground
1/2 tsp white pepper, ground
3 tbsp fish sauce (*soy sauce works well too)
2 tbsp fresh lime juice
1 tsp raw sugar

Method:

1) Combine all ingredients into a food processor (or blender) until finely pureed. Ta-da! If you do not have a food processor (get one!), you can still make this dish, it just requires a lot of manual chopping. A mortar and pestle could help with grinding as well.

Curry

Ingredients:

1 can low-fat coconut milk
2 breasts chicken, boneless and skinless, chopped into 2'' chunks
1 cup of broccoli, chopped
1 cup green bell pepper, chopped 1'' chunks
1 cup red bell pepper, chopped 1'' chunks
1 cup snow peas, whole
1 cup spinach, finely chopped
1 cup white onion, chopped 1'' chunks
1 tsp olive oil

Method:

1) On high heat, drizzle olive oil in a Wok (or deep pan) and add green paste until fragrances are released (approximately 2 minutes).
2) Reduce heat to low-medium and add entire can of coconut milk. Add chopped chicken and onion, simmering until chicken is thoroughly cooked (approximately 20 minutes).
3) When chicken is about 5 minutes from being completely cooked, add desired vegetables, turn off heat, and cover Wok with lid. Let vegetables steam for 2-3 minutes (*I prefer my vegetables on the raw-side, steam longer if necessary). 
4) Spoon heaping portions of curry and sauce over brown rice, to make a soup-like consistency. Top with fresh cilantro, and serve!

Arugula, Kalamata, & Heirloom Tomato Bleu "Pizza"


Since the New Year, I have temporarily given up gluten in my diet in preparation for my upcoming wedding. Growing up with my father who was a diagnosed Celiac, we never ate pasta, pizza, bread etc. But, I simply can't do without them anymore! I love my Italian flour-filled delicacies! In an attempt to accommodate my diet, I've been experimenting with gluten-free crusts. This recipes detail a cauliflower-based crust, which when cooked properly, is simply delicious! Feel free to use a regular pizza crust - it's all about the combination of these toppings!

"Pizza" Crust 

Ingredients: 

½ head cauliflower (about 2 cups riced)
1 clove garlic, minced
1 egg, beaten
1 tsp basil, dried
1 tsp oregano, dried
1 cup part-skim mozzarella cheese, shredded
2 tsp cornmeal (for bottom of "crust")


Method:
1) Preheat oven to 400F.
2) Lightly grease a cookie sheet or pizza stone with olive oil.
3) Chop cauliflower into florets and pulse in a food processor until the texture is similar to rice (*you can grate if you do not have a processor).
4) Saute cauliflower on medium heat for approximately 5-10 minutes, or until translucent in appearance.
5) In a bowl, combine cooked cauliflower with garlic, egg, oregano, basil, and mozzarella cheese.
6) Spread dough out evenly to approximately ¼ inch thick.
7) Bake for 25-30 minutes, or until the crust is golden brown, crispy on the edges, and cooked throughout the middle.
8) Remove crust from the oven, and transfer to a flat surface. Sprinkle cornmeal on the used cookie sheet, and re-transfer pizza back on top of cornmeal.
Topping

Ingredients:
1 cup pizza sauce
2 cups fresh arugula, coarsely chopped
1 cup Kalamata olives, pitted and chopped
1 cup Bleu cheese, crumbled
2 cups baby heirloom tomatoes, halved
Method:
1) Spread baked crust with tomato sauce. Arrange tomatoes and olives around the surface of the pizza crust, and add crumbled Bleu cheese.
2) Broil pizza for approximately 5 minutes, or until cheese is melted.
3) Remove from oven and generously add fresh arugula.
4) Let pizza stand for an additional 5 minutes, then serve!